Showing posts with label paint. Show all posts

Sunday, August 29, 2010

from gold to... gold

I decided to paint the gold mirror. I had posted my dilemma on a decorating forum and out of 49 votes, 96% said yes. So that was that... paint it is!


I started with a light coat of my usual white primer and then sprayed with a coat of Krylon Satin Ivory.


I thought about distressing and glazing it to mach the bench sitting underneath the mirror. But I wanted to do something different, and play off the style of the mirror. So, I decided to make it gold. Just not quite the bright and blinding color it had been. Instead, I went to Hobby Lobby and purchased some liquid gold leaf for $5.


Using a small foam brush, I used a couple drops at a time to apply a light coat to the mirror. I have to say that it was super easy to use. Unlike the glaze, it didn't dry moments after hitting the piece. It took me about 10 minutes to apply on the entire frame, creating a great patina.


I took some pictures outside so you can really see the gold color and shimmer, but here it is completed in its current home.


Friday, July 2, 2010

a "new" bench

In January I posted about a bench I found at my fave thrift store.


Well, I finally got around to finishing it today. After tearing off the gold chenille, there was a layer of some hideous upholstery fabric with some odd stains that gave me the willies. A little white paint, some new padding and a half yard of fabric later....


I first painted it with some of the leftover paint I mixed for our coffee table. It looked a bit too stark with the fabric, so I distressed it and covered with a very light coat of some leftover glaze I had from a cabinet.

The fabric is not exactly what I had been looking for, but there is a serious lack of good fabric stores in the Milwaukee area. The closest thing to me is a Jo-Ann fabrics - which is neither that great, nor very close (20 minutes). For only $6/yd, I decided I could easily replace it if I found something I love.


Bench - $15
Paint & Glaze - $0 (leftover)
Padding & Fabric - $5

Total = $20

Monday, June 28, 2010

another month, another post

I was talking to a friend over the weekend who said she had just been on my blog to get suggestions on spray paint and primer. It was then that I realized how long it had been since I had blogged. It gave me the motivation to finish up a couple things today (so thanks Amy!).

The first is a chair I got a garage sale for $1. The best part is the previous owner had done most of the stripping already.


I whipped out my new paint sprayer along with some paint I already had. A little scrub down with a sandpaper sponge and here it is! (Although it is very hard to see the distressing in the picture)


My new favorite find is this 1950's white metal garden cart. The wheels still even work! I had to look three times at the sticker to see it was priced at only $2!
I look forward to our landscape redesign and finding it a permanent home. For now it sits amongst my hydrangeas... which I cannot wait to bloom so I can enjoy them on my mantel.


Finally, I cut some fern leaves out of our yard to use in my ironstone creamer, which was only $1 at my fave thrift store

Friday, May 28, 2010

spray paint + old chairs

Is it Friday already?! I had every intention of updating the blog on Sunday night, but after spending 6 hours painting in the 85 degree heat and high humidity I could hardly move. Before I knew it, the nights flew by and here I am.

First off, let me say that I hate folding chairs. I hate sitting in them (they are always so uncomfortable) and I hate the way they look... so I began using old kitchen chairs. We had some at home and shined them up with a couple coats of black spray paint. And just like that we have extra chairs that dinner guests won't mind sitting in. Yes, they take up much more room than folding chairs, but we have a large basement where we keep them.

A couple weeks ago, I found four of these Windsor chairs for only $6 total. Perfect for our use.


I picked up some of my favorite primer and flat black spray paints. After much use of varying brands, these are they only two I will use anymore. The only problem is the primer is sold at Home Depot and the paint at Ace.


Two cans of each and Voila!


So much nicer than cheap plastic folding chairs!

A couple months ago while browsing a thrift store, I came across this old rocking chair. For only $7, I had to get it for our front porch.


I first used some wood filler for the chips on back and center crack. Then it was painted with the same spray as the kitchen chairs, starting with a coat of the 2x gray primer.


Here it is, in its new home.


Sitting beside the rocker are two galvanized wash tubs. I cannot tell you how excited I was to find them at a garage sale...especially at $2 each. I had been looking for one to use for firewood, and these were perfect. To think I almost walked with just one of them.

The smaller one will be used as a party tub for drinks on ice and the larger one has been loaded with firewood. I decided to place it on the front porch, just under the window. I am hoping its location will keep prying eyes from getting right up to the glass.


Finally, I got to use my new paint sprayer! I had bought a dresser for use at work and thought it would be perfect piece to try out the sprayer. The dresser needed to be functional, but not pretty. So even if it was a botched paint job, it would not matter. Honestly, I think it was uglier in real life than in the picture.


It was a bit of a struggle, but I really learned some things in using the sprayer. In all, it turned out pretty well. Given some of the faux pas, I decided to distress it slightly. I also sprayed the hardware an oil rubbed bronze color. I only wish I had thought to fill in the holes of the missing knobs. Oh well, it will still serve its purpose well.


Cost Recap

4 chairs = $6
rocking chair = $7
4 cans spray paint = $7 (after using $5 in Ace Hardware)
3 cans gray primer = $9

galvanized tubs = $4

dresser = $5
leftover paint = $0
hardware spray paint = $3

Total for all = $41

Friday, February 19, 2010

white & brite fireplace

Exactly 8 years ago we officially began the transformation of our home. I can say this with confidence as it was during the 2002 Winter Olympics that we first painted the Family Room a butter yellow color... covering the awful wood paneling. Well, it has taken about that long to convince D that we should paint the fireplace. It is a bland red-orange brick that I have never been fond of.

I did get him to agree to paint the cabinets several years ago. And by agree, I mean I started painting it one Saturday morning while he was still in bed. Once he got out of bed there was no going back. Frankly, this idea came from my mom saying "men cannot visualize, they just have to see it". I decided once he saw paint, he would know it was a great idea... and I was right. I will say this is the first time I did something this devious, but in the end he loved it. I think that is when he learned to trust me, and my crazy ideas.

I actually gave up on the painting idea a couple years ago, so I was shocked when D mentioned a few months ago that we should do it. We toyed with building a facade, or even ripping out the old brick and building a new fireplace, but, in the effort of saving time and money, we decided to paint. I was convinced it would work when reading the post on Young House Love.

We used Behr's Paint and Primer in Camembert and it worked great! Only 2 coats needed for full coverage. This sure beats 4-5 coats of separate prime and paint it would have been. We also repainted the mantle and went from this....(recently decorated for xmas)


to this....


Now I have still have some decorating to do, and we are looking to give a little style to the mantel, but you get the idea. I just hope we don't have wait until the 2014 Olympics to paint the wall a new color. I am a little tired of the yellow walls, but shhhhh..... don't tell D yet ;)

I also wish I had a true before picture with the faux wood paneling, dark mantle and brass FP screen (which was spray painted black 8 years ago), then you could really see what a transformation it has been.

Tuesday, January 26, 2010

five, five dollar, five dollar mirror

D and I went to IL this weekend so he could repair mom's PC. AT&T Tech Support was not able to help her (in spite of the outrageous fee they charged), so she needed to bring in the big guns... my hubs.

With him spending what ended being the next 24 hours on the computer, mom and I went out for a little resale and thrift store shopping. At the first store, I found my biggest score of the day....
I had been wanting a large floor mirror and were just about to leave when I spotted one stacked up behind some others in a corner. We dug it out and noticed how banged up it was. On the bottom was a big split in the wood; but I was planning to paint it black anyway, so I could deal with the nicks. Now I needed a price. I flagged down an employee who had to check. I was thrilled when he returned to tell me all mirrors were $5. SOLD!

The color was actual a nice rich mahogany, but with all the damage I was not about to put that much work in to keeping it's color. Black paint, here we come!


A little wood filler, some primer, a can of black paint and we have....


After spending some time in the garage on the mirror, I came in and spotted these little stinkers out the back window. You can't really tell in the picture, but I am thinking they do this often as they were some chubby little squirrels.

Saturday, January 16, 2010

"new" table and chairs

I was recently inspired by this photo and decided that a coffee table like that is perfect for our in-progress living room.


So on the hunt I went searching for something on Craig's List that I could make my own. I found this one that had been posted for several weeks and was able to score quite a deal in getting it for $25.


It is actually a dining table that we cut down to coffee table height. A little work with the belt sander, a couple cans of spray primer, some paint color I whipped up from a variety of white oops paints I already had, and two days later we have this. It's perfect for sitting around to play games!


Believe it or not, those cute white chairs behind the table had been in my parents' basement the last 30 years, and used to look like this...


A few weeks at the upholsterer, combined with several yards of fabric and we have the following.


The photos behind the chairs are new too
. We purchased the square frames from Kohl's at their usual 50% off. We also had an additional 30% off while earning Kohl's cash, which made them a steal. We tossed out the mats that were with them and D cut our own. The photos themselves are all pictures we have taken on our various travels. We had planned to only have six pictures, but have since decided to add two more and are just waiting for them to be finished. The space is already there and ready for them to be hung.

While at an Estate Sale Friday, I found the perfect little round table to go between the chairs. It needs a little work and I am hoping to have it done in the next couple days.

Tuesday, December 8, 2009

mo' money

As I mentioned a few weeks ago, we have been working on finally getting some things up on the walls. Around that time I was inspired by foreign currency artwork I had seen on art.com. It got me thinking that we could make our own, using currency from places we have been. Unfortunately we don't tend to keep paper money and mostly all we had were coins. So on the hunt we went. Through the help of friends, family and eBay, we were able to find everything we needed in just a few weeks.

I had originally started with only planning to have one piece, but becuase there was so much currency I wanted to include, we knew we had to go to two. However, we didn't think we had enough money for two frames, so we included Canada and Mexico as well. Each frame with 5 bills - one set from before we were married, and one set from after.

I found two frames from thrift stores and spray painted them black.

Here is the inspiration piece:

This was a very inexpensive piece of art. We spent about $10 for the two frames, $14 for the mat board, a few bucks for the spray paint and voila!


(I am going to try to get a better picture tonight, when there is not so much glare from the windows. )

Thursday, November 5, 2009

is there anything that can't be spray painted?


It is hard to even begin to list
all the things in our house we have spray painted the last 8 years - everything from furniture, bathroom fixtures, photo frames and a fireplace screen. I have even read of some who spray paint doorknobs!

I wanted to share my recent finds and accomplishments. Even though I write with a sore shoulder from all the sanding and spray painting...


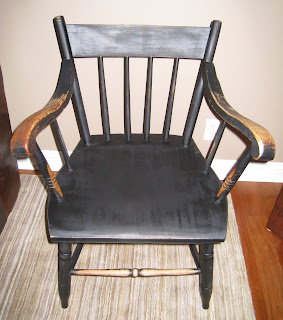
A couple weeks ago I purchased an old, black arm chair. I have a thing for interesting antique (looking) chairs. So much so that I need to stop as I really have no other places to use them. However, I could not pass this one up that I found at an estate sale. I fell in love with the natural rubbings on the arms and front rungs. Not to mention how hard it is find arm chairs! However, the seat was quite a mess and I was not so sure what to do with it.

Today I worked on sanding down the seat, and a few other areas that needed some attention. When D got home, he convinced me to just spray paint. So, I taped up the arms and front rungs to keep their natural distressing. There were a few spots I had to fill in with wood filler, then I used two coats of flat black spray paint. Next I took some sandpaper and distressed the other areas. Here is the finished product, although I am thinking about making a chair cushion too. We will see...


I have been struggling for months about what to do with all my long fashion necklaces. They were being stored in a drawer in my lingerie chest and it seems every time I want to wear one, I spend 10 minutes trying to untangle it from others. It suddenly hit me to make a board where I can hang them on the wall. The next step was to find something large and cute to use as a frame

The large gold frame in the picture above was it! It was another estate sale find, and at $5 (with no glass) I could not pass it up. I stripped and sanded as much as possible, then primed with spray primer and finished with a coat of a slightly off-white can of 50 cent oops paint. To complete the Shabby Chic look, I distressed it lightly. Then I spent two hours working to untangle everything so they could be hung.


The little blue box in the above picture is a circa 1960 train/make-up case. I had found it at an antique store with a price of $17. I had gone to another store across the hallway to find a similar case for $34. Really? double the price? I went back to the first store to have another look and that is when I spotted the $6 markdown sticker. SOLD! I plan to use this with some other vintage suitcases I have found in the last couple years.


In my stops at Goodwill, I also found these two little candle holders for a total $3. The white one is pretty cute as is, but I bought it with the intention of spray painting it silver. The already silver candlestick needed a good scrubbing to get rid of all the wax dripping.


Here they are, ready for display, along with a $2 flame less candle on clearance at Marhsalls/Homegoods.


Although Halloween has come and gone
, I wanted to share my cute little skull from Goodwill. It was not in great shape and the paint was peeling off, but it was the perfect little guy to paint a nice glossy black - especially since it was a steal at only $1. After painting him, I thought about maybe doing it in silver for a Terminator look. Maybe next year....


Finally, I decided to jump on the bandwagon of making your own cake stands. While I have been collecting antique plates I would like to use, I needed something to test it out. These $.70 plates (from Homegoods) and $.20 cordial glasses (from thrift store) were the perfect trial. I got a $3 tube of Duco Cement to hold it all together. A day later and here is the finished product...(they are not attached to each other, just gently stacked)

Monday, October 26, 2009

watercolor wonder

The watercolors have been hung! It took a couple days longer than expected, but, with a bit of patience, we got through it. Only one of them was re-matted and 3-4 of them have "new" frames.... and by new, I mean they were from my finds earlier in the week. All of the frames were originally gold and I spray painted them black. To add a little character I lightly distressed them to show some of the gold underneath. Unfortunately, on a couple of the frames the paint came off with barely any touch from the sandpaper and are showing more gold than I would like. I am thinking about repainting and trying those two again. We will see....


Luckily
, D was an Art History major and worked for a few years at the Art Museum in preservation and restoration... so, in addition to his own mat cutter, he truly knows how to properly mat and frame any piece of art.

Blogger Tips:
* We have spray painted many items over the last several years and have found that Krylon spray paint from Ace goes on the smoothest, with the least drip. It's also the easiest on your trigger finger.
* Never, ever use cardboard in any type of photo or art frame as it causes the art/photo to fade.

This is a wide shot of the wall with the watercolors. The large cabinet in the corner is our game cabinet from Bucks County Furniture. We had it built to our specs to hold all our new and old board games. It is nearly full. Below the art is a cedar chest I bought at at consignment shop for $15. I have been meaning to refinish it. The small box was my grandfather's old tool box and the globe came from D's grandfather (via his dad). There is also a National Geographic from 1947 and the vintage suitcase was a quite find for $2 from a random thrift store in SW WI.

Friday, October 23, 2009

one down... too many to go

I completed the first project of my finds from this week (yay!). It is the $3 wood step stool I found at the estate sale, and I tell you, it was much more work that I had anticipated. After trying to strip off and sand 3 layers of paint, I wondered if any of them were lead paints. Oh well, too late now I suppose.

Before
With my 50 cent worth of Oops Paints.

During
There were three paint layers, the bottom layer was a kelly green oil-based, followed by white (primer perhaps?) and then barn red.


After
I decided to distress the piece since it had its own natural rustic look already. Plus, I knew that no matter how hard I tried, I would never get a perfect coat of paint with the mess of previous paint layers.